The Northwest Indians belief system included Totemism and the decision to construct and raise a totem pole was a serious matter and subject to rituals and ceremonies. The chart on this page describes the procedure adopted by Northwest Indians and how to make a totem pole. How to make a Totem Pole - Types of Trees
The types of trees used to create Totem Pole by the Northwest Native Indians were the red and yellow cedar trees. - Cedar trees are tall with large diameters
- They have fewer branches than other trees native to the Northwest Pacific Coast
- Their needles are very flat and soft unlike the sharp needles of many other trees
- The soft wood of a cedar tree has a straight grain and is easy to carve
- They are the least prone to decay and rotting & have a lifespan of about one hundred years
How to make a Totem Pole - Designs
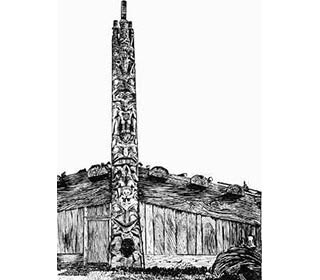
Totem poles are carved and painted with symbols and totems or figures such as animals, that represent clans or families and relates to their beliefs. The designs and symbols on a Totem Pole are complex and tell a story. Every animal depicted on a Pole and every color had a special characteristic, meaning and significance. The position of figures on the pole were also significant. Refer to Totem Pole Art and Design for additional facts and information about the design of Totem Poles and their symbolism. How to make a Totem Pole
The following list details a step-by-step guide to the process adopted by Northwest Native Indians when creating Totem Poles. A similar process may be followed when undertaking a school project on how to make a Totem Pole. Stage 1: Planning:
A meeting with the artist, carvers and helpers to plan the style and design of the Totem Pole and the symbols to be used and created. The size and dimensions of the Totem Pole would also be established.
Stage 2: Creating a model: The artist would create a small model reflecting the design of the totem pole and the position of the carvings and symbols required
Stage 3: Locating the tree: The tree was the main material required. A red cedar tree of the correct height and size would be sourced in the forest. The tree trunk also needed to be straight with a minimum amount of knots or imperfections.
Stage 4: Cutting down the cedar tree: The cedar tree would be cut down, branches removed, and the helpers would carry the log to the house of the artist where the Totem Pole would be made. Sometimes high strong branches were left intact to play a part in the design, such as for the beaks of images.
Stage 5: Positioning the tree: The tree would be laid on its side as the totem pole would carved lying down where the carver could easily reach all parts of the log.
Stage 6: Preparing the Tree: The outer layer of bark would be stripped from the tree and the tree trunk would be smoothed by the helpers and carvers, taking instructions from the artist.
Stage 7: Sections Marked: The Totem Pole was designed and carved in 3 sections - the bottom, middle and top sections would each be marked. The bottom section required the most attention and importance as this would be closely viewed by observers.
Stage 8: Creating an outline of the design: Each design element would be etched on to the wood by the artist ensuring the correct placing and proportions of each of the elements
Stage 9: Creating an outline of the design: Each design element would be etched on to the wood by the artist ensuring the correct placing and proportions of each of the elements
Stage 10: First Cuts: The first rough cuts were chopped into the tree trunk and notches made indicating the design elements of the totem pole
Stage 11: Bottom Section Carved: The bottom section is carefully carved with its symbols and figures and flattened where necessary. The artist would pay close attention to the grain and the coloration of the wood to capture the sense of life and movement in the carving.
Stage 12: Middle Section: The artist would often delegate some of the middle section carvings to an apprentice.
Stage 13: Top Section: The planning of the top section might include the inclusion of elements such as wings and these would have to be securely attached to the main trunk. The Haida tribe often placed three Watchmen on top of their totems
Stage 14: Painting: Once the carvings on the Totem Pole were completed they were smoothed down ready for painting. Like the images, each color had a specific meaning to the Northwest Indians. Some totem poles were painted on the ground, whilst others were painted after they were erected.
Stage 15: Raising Ceremonies: The completed Totem Pole would be erected accompanied by rituals such as Totem Pole Raising ceremonies, funeral ceremonies and Spiritual Healing ritual. |